Saturday 27 April 2013

Coco / Outfit


 photo IMG_2987_zps4f5c72bd.jpg

 photo IMG_2991_zps2134d8eb.jpg


sweater - Ohio Against The World / clutch - Vintage by Fe via Bloggers Wardrobe

As mademoiselle Coco would say, c’est la vie. I haven’t had a chance to post as often as I’d like lately, but, I promise, if you just hang in there a few more weeks - good things come to those who wait. Or something like that!

I still love you tons, my babes!


Follow on Bloglovin


Thursday 4 April 2013

Nude Leather Crop Top / DIY


 photo IMG_2959_zpsa1f434a2.jpg


 photo IMG_2949_zps5cdddbd7.jpg


 photo IMG_2971_zps4fc037c0.jpgHow many leather like tops can one have? Right now I’m at 4, to be exact. This one was made yesterday and, it might be a favorite. The fabric is softer than the other ones and, I feel, it could be put to use a lot this summer. It was made in a very similar manner as this one, except now I have a sewing machine so instead of having it ready in a little bit of time, it was done in no time. Just try!

And now time for a poll. Which version do you prefer - with a matching choker or without? I was thinking the choker/collar could be used on days when this is supposed to be a little dressed up, and without for just a casual look. Which version do you like better?


Follow on Bloglovin


Sunday 31 March 2013

WHITE / outfit and words


 photo upside_zps69837ad5.jpg

 photo IMG_2889_zps5450aee6.jpg


 photo fullbody_zpsf23e0661.jpg


jacket - H&M (gift from a friend) / top - thrifted
/ denim - vintage + DIY (see DIY post here)
/ boots - vintage


Happy Easter, babes! All white seemed like the appropriate attire today. If you have been reading my ramblings for a little while you might have noticed that I’m very open about my beliefs. Even though this may not be the actual date, and even though we have made up an enormous amount of unrelated traditions, today and every day really is the day I celebrate my God raising from dead and covering my disgusting sins. His love is bigger than we can comprehend and available for all. I hope this day is filled with joy for you!


Follow on Bloglovin


Friday 29 March 2013

JUST DO IT / words


 photo instagram-2_zpsf7e79527.jpg

I know it has been a bit quieter around here than usual. Well, the reason is that a big move is coming up. Soon enough I won’t be posting from Cleveland anymore so a lot of preparation is in place.

And now is the moment for me to get all gushy and tell you to follow your dreams and not let fear stand in your way. Fear is just a feeling that has no substance on it’s own. When something is not done just because of a doubt if it would work out, we never even give ourselves a chance to achieve our goals. You know what they say, JUST DO IT.

I’ve been, however, updating my instagram pretty regularly (@karinadejesus__), and here are a few shots.

Happy weekend, you babes!


Follow on Bloglovin


Sunday 24 March 2013

Clear Wrap Belt / DIY


 photo IMG_2827_zpsfa4bf181.jpg

 photo zipper1_zps0d9a78ed.jpg

 photo zipper_zpscc9552e1.jpg

To make this clear wrap belt inspired by MMM, all you are going to need is clear vinyl, thread and needle or sewing machine, tape measure and a zipper. Measure your waistline and decide how long you want the belt to be based on how tight you want it to be. That will be the length of a strip you’ll  cut out of the vinyl. Mine ended up being 52 inches long (to go around my waist twice and have some space for the garment it will go over) and 5 inches wide. Sew on the zipper. Wrap around your widest shirt or sweater, zip, and there you have it. My vinyl was not long enough so I actually cut two strips and sew them together.

If you have any questions, please, don’t hesitate to ask!


Follow on Bloglovin


Thursday 21 March 2013

Vintage Love / OUTFIT and WORDS


 photo 130310-karina-blanket1807_zps941a9b32.jpg
Photo by the super talented Peter Larson


I just had to share this quick photo Peter snapped of me after a test shoot we did recently. I am wearing another vintage gem gifted by the same friend that found this jacket for me. Vintage is my absolute favorite to wear for several reasons. First of all, very often vintage garments are crafted a lot more carefully and using higher quality fabrics (genuine leather in this case) than high street clothing or even some designer apparel as mass production often reduces the quality of the initial design. Second, I do not believe many other people will have the same jacket (who am I kidding, I’m pretty sure I’ll never run into anybody with this jacket on…), and last but not least, reusing clothes equals recycling and not cluttering our world with just more and more stuff. And just look at that detailing! This jacket has such character, a life story of it’s own.


Follow on Bloglovin


Monday 18 March 2013

Vintage High Waisted Denim / DIY


 photo beforeafter-1_zpsee32246b.jpg

 photo steps_zps4edefa10.jpg

 photo final_zps5647751a.jpg

Remember I told you that I was on a hunt for vintage white jeans so that I can totally violate them and make them into skinnies? A day later I realized that I already had a pair. I had bought this pair of vintage denim thinking I’d wear them as boyfriend jeans, but sometimes life just doesn’t work out the way you plan. Well, that was a bit dramatic when talking about a pair of pants… Basically, what I’m trying to say, is that I had this pair of denim, I wasn’t wearing them enough so they were transformed to a style that can be worn every single day. Worked out perfectly.

How to:

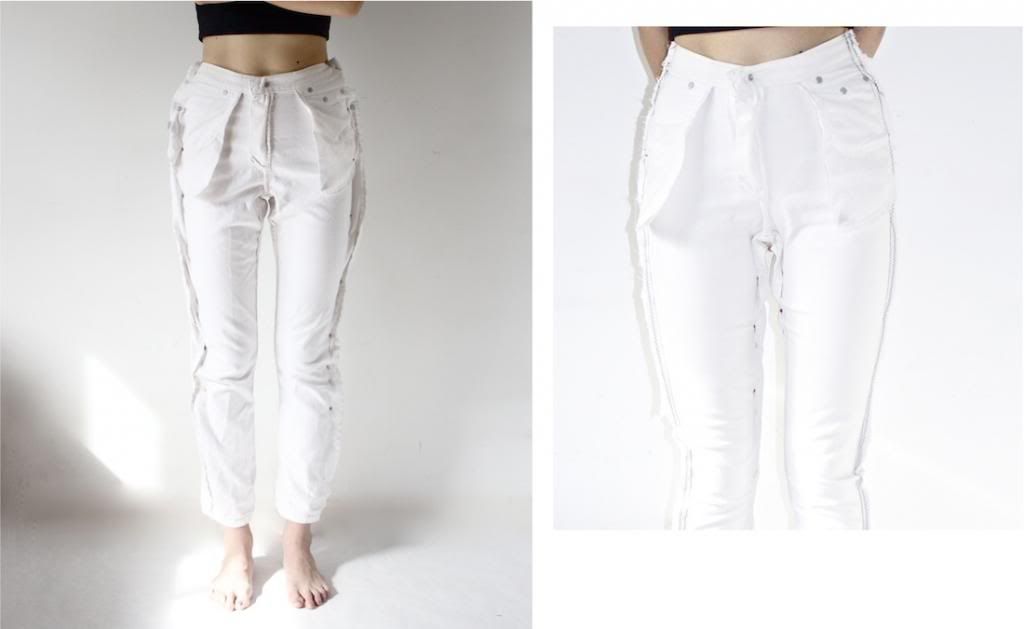
1. Wear your denim inside out and pin the sides so that the hips and legs fit. Don’t worry if the legs are not as tight as you want them to be right away, just pin it so that the fabric lays well.

2. Make a seam where you have pinned.

3. Cut off the excess fabric on the sides.

4. Make a zig-zag seam where you cut-off the fabric. This will prevent the fabric from fraying when washing.

5. Try on your denim inside out again and pin the inseam of the leg. Now pin them as tight as you want the end result to be.

6. Make another seam where your new pins are.

7. If there is too much excess fabric on the inseam, cut it off again and do a zig-zag seam.

And you’re done!!! Enjoy your new jeans!

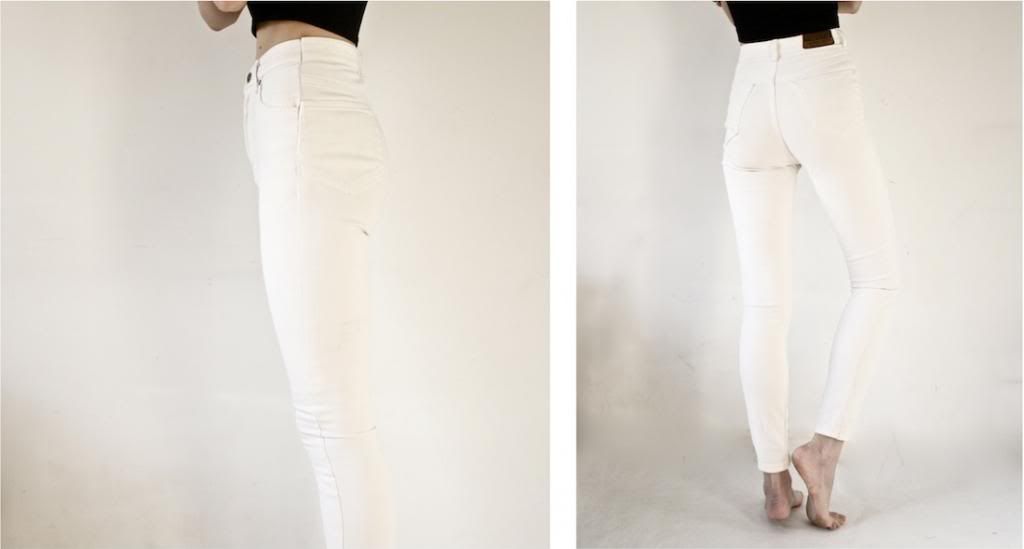
I really like that there are some imperfections - you can see that one of my pockets is a bit more to the side. That just gives these jeans a bit more character - you go and try to find a pair like this at Forever 21! I dare you!


Have a productive week, my babes!!!


PS. UPDATE: I did want to mention that in my last post, where I first shared the art of transformation, the pants fit perfectly in my waist so all I had to do was starting step 5! So, obviously, the better fit you find, the easier it will be for you to alter.


PPS. Vancouver Fashion Week starts tomorrow! I’ve never really followed VFW before so I’m super excited. Expect to see some of my favorites!!


Follow on Bloglovin